How to boot a Raspberry Pi 4 from SSD – the ultimate 2020 guide
Sorry for the clickbaity title. But after many failed attempts and many non-functioning tutorials I thought I may be eligible for some exaggeration.
Without further ado – let’s jump directly into the ingredients it needed for me, to make my Raspi 4 boot from SSD. Oh btw, all links are NO affiliate links so please buy the stuff where ever you want.
(You may ask why do you may need this list – well I bought some SSDs and enclosures that unfortunately didn’t work. James A. Chamber has a list of known working adapters and chipsets. So to prevent you from doing the same mistakes, here are my parts that worked for me. You milage may vary and don’t at me, if things don’t work for you.)
- Raspberry Pi 4 Model B with 8 gigs of RAM
- Aluminium Heatsink Case for Raspberry Pi 4 – also in other cool colours available
- Transcend 64GB High Endurance microSDXC/SDHC card – according to James A. Chamber the fastest microSDXC card available
- Samsung 970 EVO Plus Series MZ-V7S500B/AM internal SSD – also according to James A. Chamber the fastest SSD available
- UGREEN SSD M.2 NVMe enclosure – one of the few USB 3.1 capable enclosures
- AmazonBasics USB 3.1 hub with 7 ports – since the SSD draws a lot of power it is necessary to have a powered USB hub that can also power the Raspi
Some final remarks: Everything computery was done on a Mac and if you wonder: I am by no means a Linux or Raspbian pro. So if some parts are old cheese for you just jump over them but don’t blame me if things don’t work for you. Also: this guide was inspired by this German article (which is unfortunately behind a pay-wall), which took me 80% of the way, but since some parts were missing, I added them to my guide. Let’s go.
Part 1 – prepping the microSDXC
- Insert the microSDXC card into the SD card adapter and insert the duo into your Mac’s SD card slot (if it still has one). If your Mac asks you to initialize your microSDXC card simply click on the “Ignore” button.
- Download the Raspberry Pi Imager for your Operating System
- First select the OS you would like to flash to your microSDXC card. I went with “Raspberry Pi OS (32-bit)”
- Now select the drive where your microSDXC card is – IMPORTANT – be totally sure about the drive you chose. A good idea is to compare the capacity which should be identical to the one of your microSDXC card. If any of your other drives has the same capacity, be double cautious!
- And finally write the OS to the microSDXC card.
- The Raspberry Pi Imager will eject your microSDXC card after it is flashed. To do some final touches remove and re-insert the microSDXC card with the SD card adapter.
- Since I am planning to proceed with the setup in a “headless” way – meaning no monitor, keyboard or mouse attached to the Raspberry Pi – I need to enable SSH and would like to give the Pi a fixed IP.
- So upon re-inserting the the microSDXC card with the SD card adapter start the Terminal app and enter this command:
sudo touch /Volumes/boot/ssh– this produces an empty file on the microSDXC card with the file name “ssh” which enables SSH once the Pi has booted. - Next up we want to give the Pi a fixed IP number. I won’t cover how to find one on your network – pls. DuckDuckGo for yourself. For now enter
sudo vi /Volumes/boot/cmdline.txtin the Terminal. This opens the file “cmdline.txt” in the editor vi (if you prefer nano, be my guest). On the first line jumpt to the end by pressing “$” followed by the letter “i” which enterst the “insert” mode. Add at the very end of the first lineip=192.168.83.216– don’t forget the space and of course pls. take your personal fixed IP number. Now press “Esc” to leave the “insert” mode and enter:wqfollowed by a press of the return key. This writes the file to the microSDXC card and quits the editor vi. - So far so good, now eject the microSDXC card with the SD card adapter from your Mac and take a deep breath.
Part 2 – prepping the Hardware
Time for some relaxation: now we do some hardware tinkering.
- Install the heatsink to the Raspberry Pi
- Remove the microSDXC card from the SD card adapter an insert it into the Raspberry Pi
- Insert the Ethernet cable into the Raspberry Pi
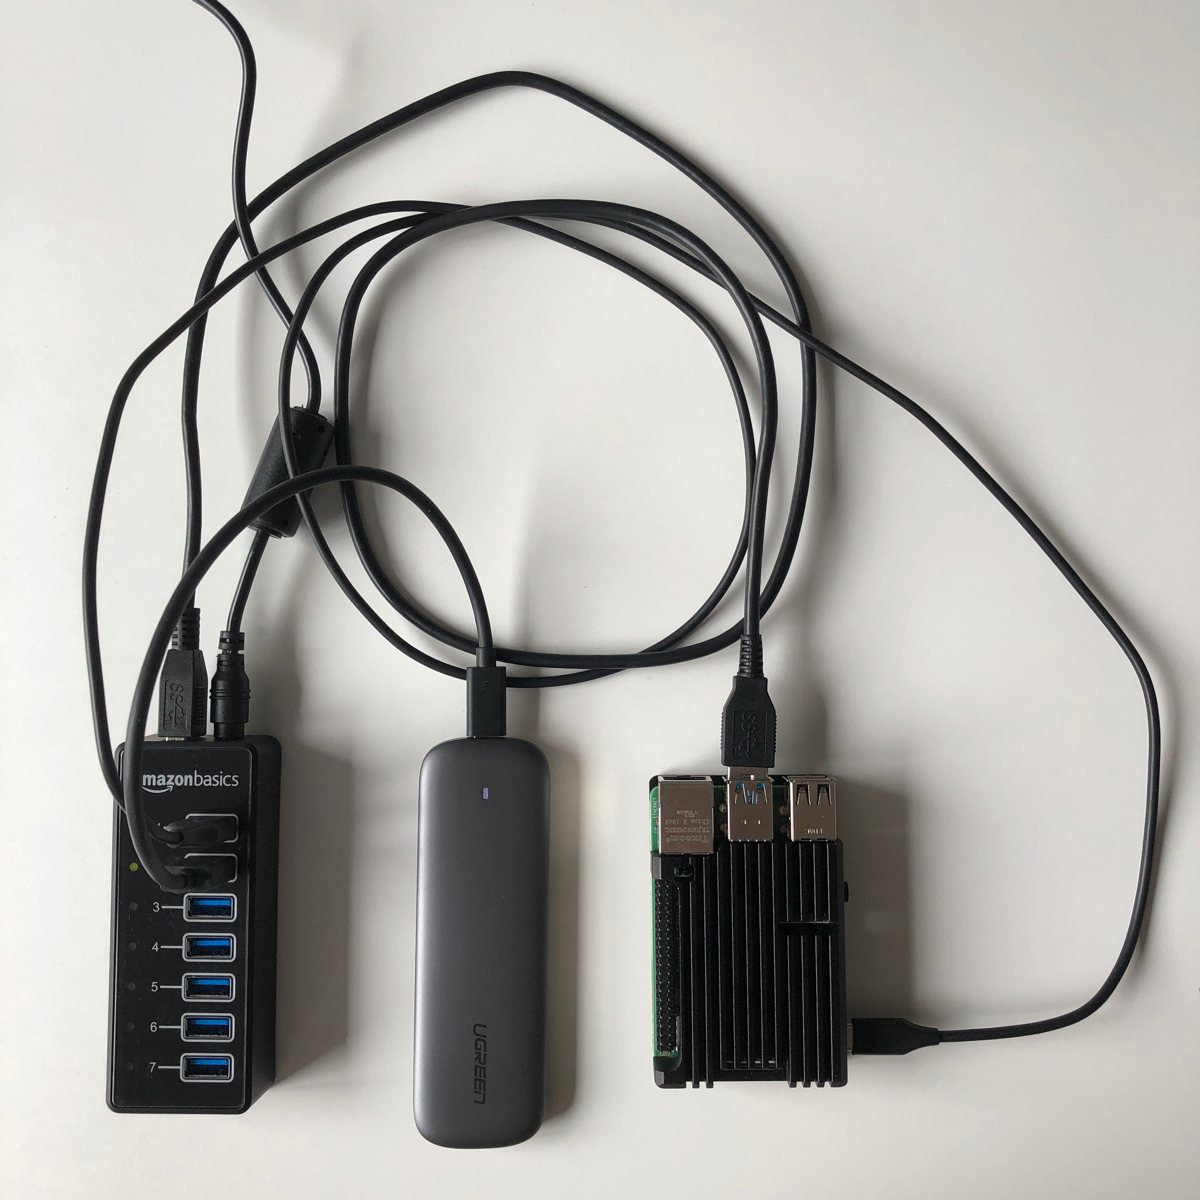
- Insert the Samsung 970 EVO Plus into the UGREEN SSD M.2 NVMe enclosure, close the enclosure and connect it with an USB-C to USB-A cable to port #2 of the AmazonBasics USB 3.1 hub
- Now connect the Raspberry Pi to the port #1 of the AmazonBasics USB 3.1 hub with an USB-C to USB-A cable
- And finally connect one of the four blue USB-A ports of the Raspberry Pi with the AmazonBasics USB 3.1 hub and the special USB cable that was delivered with the hub.
- Aaand final finally connect the AmazonBasics USB 3.1 hub to the power brick (which seems to hum quiet a lot according to some buyers on Amazon)
Ideally your whole setup should start-up as indicated by a lot of flickering of the LEDs on the Raspberry Pi and on the UGREEN SSD M.2 NVMe enclosure. If the LED flickering becomes less hectic you may try to ping your Raspberry Pi from your Mac by entering this command in the Terminal app: ping 192.168.83.216 – of course you should use your personal private IP number. If the ping command answers with something like 64 bytes from 192.168.83.216: icmp_seq=1 ttl=64 time=0.278 ms everything is fine. Something like Request timeout for icmp_seq 0 or No route to host is not. If you can’t ping your Raspberry Pi it is hard to diagnose since it could be hardware or software related. Try to ping your router address for example or attach your Pi to a monitor to look for some obscure error messages. If you are pinging successfully to your Pi stop it by pressing control+c simultaneously and proceed to the next step.
Part 3 – prepping the Raspberry Pi
- Now connect to the Raspberry Pi from the Mac via SSH. Therefore enter the following command in the Terminal App:
ssh pi@192.168.83.216– again, pls. use your personal private IP number. - If you are asked for a password pls. enter
raspberry - We now need to fresh-up the Raspian OS with the following two command:
sudo apt updateandsudo apt install rpi-eeprom-images– the latter one will ask you if you are sure and how much disk space it will cost you. Simply type the letter “Y”. - At the time of writing only the stable firmware branch supports booting from USB drives. Since the default update process only installs critical firmware updates we need to switch to the stable branch and update the firmware. This can be done with the following two commands:
sudo sed -ie s/critical/stable/ /etc/default/rpi-eeprom-updateandsudo rpi-eeprom-update -d -f /lib/firmware/raspberrypi/bootloader/stable/pieeprom-2020-06-15.bin - With everything fresh and dandy it is time to reboot the Pi with
sudo reboot.
Part 4 – prepping the external SSD
- After the reboot (the Pi is pingable and you can connect to it via SSH as described above) you need to check if the external SSD is discovered as
sda– this could be done with the commandlsblk. The second line of the output should be “sda”. - Next up we need to get a fresh version of Raspbian OS onto the SSD. Hopefully you have enough disk space on your microSDXC card because now you need to download a full image of Raspian OS with the following command:
wget https://downloads.raspberrypi.org/raspios_full_armhf_latest - My download didn’t have a file extension so let’s add one:
mv raspios_full_armhf_latest raspios_full_armhf_latest.zip - Let’s unzip the image with
unzip raspios_full_armhf_latest.zipand throw it awayrm -f raspios_full_armhf_latest.zip - Now let’s burn the image onto the SSD with
sudo dd of=/dev/sda < 2020-05-27-raspios-buster-full-armhf.imgand also throw the image awayrm -f 2020-05-27-raspios-buster-full-armhf.img
If you are cautious then keep the image around. Maybe later in the process everything goes south and you will be happy to still have the image around.
The next hurdle is that the freshly installed boot loader is not capable of booting from an external SSD – hurray. Therefore we need to swap the boot files with an actual version from the Github repo. Let’s move on:
- First download the actual firmware:
wget https://github.com/raspberrypi/firmware/archive/master.zip - Unzip it:
unzip master.zip - Mount the external SSD with
sudo mkdir /media/piandsudo mount /dev/sda1 /media/pi/ - Now copy the more actual boot files over to the SSD:
sudo cp firmware-master/boot/*.elf firmware-master/boot/*.dat /media/pi - And shutdown the PI with
sudo shutdown -h now
No we may remove the microSDXC card from the Raspberry Pi and add two missing pieces on the SSD. Therefor you need to connect the SSD to you Mac and redo the following two commands in the Terminal app:
- First enter this command:
sudo touch /Volumes/boot/ssh– this produces an empty file on the SSD with the file name “ssh” which enables SSH once the Pi has booted. - Secondly: We give the Pi a fixed IP number again. Simply enter
sudo vi /Volumes/boot/cmdline.txtin the Terminal. This opens the file “cmdline.txt” in the editor vi (if you prefer nano, be my guest). On the first line jumpt to the end by pressing “$” followed by the letter “i” which enterst the “insert” mode. Add at the very end of the first lineip=192.168.83.216– don’t forget the space and of course pls. take your personal fixed IP number. Now press “Esc” to leave the “insert” mode and enter:wqfollowed by a press of the return key. This writes the file to the SSD and quits the editor vi. - Now eject the SSD from your Mac and re-attach it to your Pi. Power it up and whoosh …
Part 5 – enjoy your blazing fast Raspi
If you would like to benchmark your new setup James A. Chambers has you covered. Scroll down on his article and see the necessary commands after the headline “Benchmarking Your Own Device”.
In general I don’t like to infuse a bunch of software on my installation like with the benchmark scripts above but from an educational standpoint it might be interesting to see how your Pi’s SSD performs.